Getting Started
From zero to your first generated image. This should take about 10 to 20 minutes.
What you need
- A computer running Linux with Docker and Docker Compose installed
- An NVIDIA GPU with at least 4GB VRAM (even old cards like the Quadro P2000 work)
- NVIDIA Container Toolkit installed so Docker can access your GPU
Setup
Get the code
If you have git installed, you can clone the repository. This downloads a copy of all the project files to your computer:
git clone https://github.com/lacquerlabs/picodiffusion.git
cd picodiffusion
The first line downloads the project into a folder called picodiffusion. The second line moves your terminal into that folder so the rest of the commands run in the right place.
If you do not have git or prefer not to use it, you can also download the project as a zip file directly from the GitHub page — look for the green Code button and choose Download ZIP. Unzip it and open a terminal inside the folder.
Create the cache directories
Make sure your terminal is inside the picodiffusion project directory from step 1. picoDiffusion keeps model files and downloaded data on your computer (not inside the container) so nothing is lost when the container restarts. These commands create the folders it expects to find:
mkdir -p cache/models/checkpoints
mkdir -p cache/models/vae
mkdir -p cache/models/loras
mkdir -p cache/huggingface
mkdir -p creates folders, and the -p means it creates any parent folders along the way too. You only need to do this once. Unless you delete them. You probably do not want to do that.
Download a checkpoint
You need at least one Stable Diffusion 1.5 checkpoint. Here are some good ones to start with:
| Checkpoint | Good for |
|---|---|
| DreamShaper | All-rounder, good at many styles |
| Deliberate | Photorealism and portraits |
| Counterfeit | Anime and illustration |
| AbsoluteReality | Photorealism, highly detailed real-world scenes |
| Dreamlike Photoreal 2.0 | Photorealistic with a slightly dreamy, cinematic quality |
Download the .safetensors file and put it in cache/models/checkpoints/. If you haven't started building the container, go ahead and do that (it's in the next step) because that will take some time. Time enough to find a few models to play with! If the container is already running, just refresh the page and the new checkpoint will appear in the dropdown.
Build and start
The easiest way is to use the included Makefile. A Makefile is just a recipe file — it contains shortcuts for longer commands so you do not have to remember them. This one automatically detects whether you have an NVIDIA GPU and sets everything up for you:
make upThat single command builds the Docker image, installs all the Python dependencies (including PyTorch), and starts the container. The first build can take around 5-6 minutes because it is downloading a lot of heavy libraries like PyTorch (~2GB). Docker caches all of this, so subsequent builds are a bit faster.
Some other useful commands you will want to know:
make down   # stop the container
make logs   # show the live log output (press Ctrl+C to stop watching)
make build  # rebuild the container without starting it
If you do not have make installed (some minimal Linux installs do not include it), you can run the Docker commands directly instead. With an NVIDIA GPU:
docker compose -f docker-compose.yml -f docker-compose.gpu.yml up -d --buildThe -f flags tell Docker Compose which config files to use — the first is the main config, the second adds GPU passthrough. up means "start the container", -d means "detached" (runs in the background so you get your terminal back), and --build makes sure the image is built first.
Without a GPU (CPU only):
docker compose up -d --buildOpen the UI
The container should start shortly, upto about 30seconds. Open your web browser and go to http://localhost:8004. If you get a "site cannot be reached" give it a few more seconds and try again. If it still doesn't come up, run `make logs` and see if you can find the error and post it in an issue here. localhost means "this computer" and 8004 is the port picoDiffusion listens on. You should see the interface.
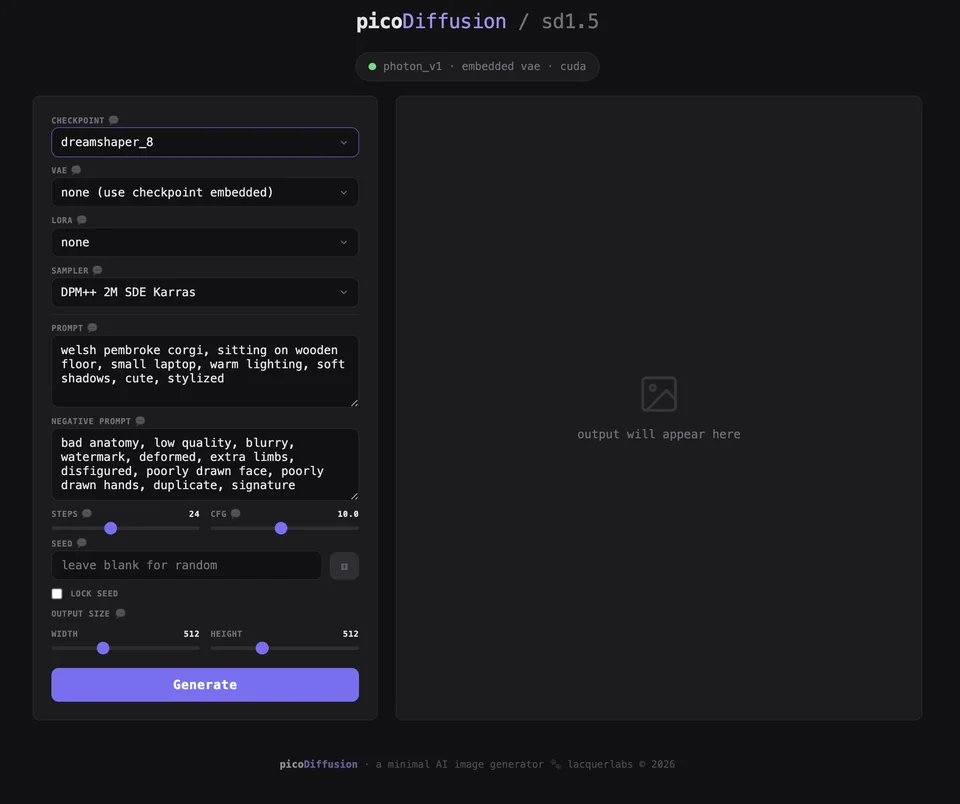
Generate your first image
- Select your checkpoint from the dropdown
- The default prompt is already filled in — a welsh pembroke corgi. You are welcome.
- Click Generate
- Wait for the progress bar to complete
The first generation takes longer than usual. Two things are happening: the model is loading into your GPU's memory, and some small config files are being downloaded from HuggingFace (a website that hosts AI model data). This only happens once — after that, everything is cached and each generation is much faster.

Optional: add a VAE
If your images look washed out or have dull colours, download a VAE file and put it in cache/models/vae/. Refresh the page and it will appear in the VAE dropdown.
| VAE | Notes |
|---|---|
| vae-ft-mse-840000 | The go-to VAE for sd1.5. Fixes washed-out colours and improves sharpness with most checkpoints. If you only download one VAE, make it this one. On the HuggingFace page, click the Files tab and download the file ending in .safetensors. |
Optional: add LoRAs
LoRAs are small add-on files that modify the checkpoint's style. Download sd1.5 LoRAs from civitai.com and put them in cache/models/loras/. Refresh the page and they will appear in the LoRA dropdown. Check the LoRA's page for its trigger word — you usually need to include it in your prompt.
Here are a couple to get you started:
| LoRA | Trigger word | What it does |
|---|---|---|
| 50s Panavision Movie | ArsMovieStill, Movie Still From Colored 1950s Super Panavision 70 Movie |
Gives images the look of a 1950s Super Panavision 70mm film. Cinematic colour grading, film grain, vintage framing. |
| 50s Noir Movie | ArsMovieStill, 50s Noir Movie Still |
Black and white film noir aesthetic. Dramatic shadows, high contrast, moody lighting. |
| 60s Psychedelic Movie | ArsMovieStill, movie still from a 60s psychedelic movie |
Vivid, saturated 1960s psychedelic film look. Bold colours, dreamy distortion, retro framing. |
Next steps
Read the guide for a detailed explanation of every control in the UI — what it does, what values to start with, and how to experiment.